Learning how to create product videos that actually sell isn't some dark art. It really just comes down to a straightforward, three-phase process: smart planning and scripting, solid production and filming, and finally, strategic distribution and promotion. When you nail these three stages, you turn a simple product feature into a story that grabs attention and drives sales.
Why Product Videos Are Your Most Powerful Sales Tool

Before we jump into the "how-to," let's talk about the why. Why is video so critical for e-commerce brands today?
Think about it: static images show what a product looks like, but a video shows what it does. It demonstrates the feel, the function, and the experience of owning it. That dynamic quality creates an emotional hook and builds a level of trust that a flat photo just can't match.
Our brains are hardwired for video. It's simply an easier and faster way to digest information. In just a few seconds, you can show a product’s scale, its texture, and how it fits into someone's life. For a customer who can't physically touch or try out an item, a well-made video is the next best thing.
The Three Core Phases of Product Video Creation
To get a clearer picture of the journey, let’s break down the entire process into its three core phases. Each one builds on the last, moving from a rough idea to a polished asset that actively works for your business.
Phase | Key Activities | Primary Goal |
|---|---|---|
1. Pre-Production | Defining goals, scripting, storyboarding, creating a shot list, and gathering props. | To build a solid, strategic foundation for a smooth and efficient shoot. |
2. Production | Filming all the necessary shots, focusing on lighting, angles, and sound. | To capture high-quality raw footage that brings the script and vision to life. |
3. Post-Production | Editing the footage, adding graphics and music, and optimizing for different platforms. | To assemble the final video and ensure it's ready to engage viewers and drive action. |
Getting these three phases right is what separates a forgettable clip from a video that genuinely converts.
The Undeniable Impact on Your Business
The move to video isn't just some passing marketing trend; it's a real shift in how people shop and make decisions. Projections show that video is on track to account for a staggering 82% of all global internet traffic by 2025.
What’s driving this? Mobile. Over 75% of all video views now happen on mobile devices. These aren't just vanity metrics; they're a clear signal that creating compelling, mobile-first product videos is a non-negotiable part of modern e-commerce. You can dig deeper into these trends with the latest video marketing statistics from Insivia.
Product videos directly address customer uncertainty. By showing a product in action, you answer unasked questions, clarify features, and set realistic expectations, which is a proven way to build buyer confidence.
The return on this effort is real and measurable. High-quality videos are directly tied to key business goals, making them an incredibly efficient tool for growth. When you truly learn how to create product videos that connect, you unlock benefits across your entire sales funnel.
Here’s a look at the direct impact on your bottom line:
Boosted Conversion Rates: A great product video gives customers the final push of confidence they need to click "add to cart." It’s often the deciding factor.
Reduced Return Rates: When a customer sees exactly how a product works, fits, or functions, there are no surprises when it arrives. This clarity is known to slash return rates by around 35%.
Improved SEO Performance: Search engines love engaging content. Videos keep people on your page longer, and that increased "dwell time" tells Google your page is valuable, which can give your search rankings a nice bump.
Enhanced Brand Storytelling: Video gives you a canvas to show off your brand’s personality and values, creating a much more memorable and human connection with your audience.
Laying the Groundwork: Your Pre-Production Blueprint
Here’s a little secret from the trenches: a killer product video is made long before you ever press the record button. The real magic happens in pre-production. This is your strategic foundation, and skipping it is like trying to build a house without a blueprint. It's where you nail down your vision and align it with your business goals, making sure every single second of footage has a purpose.
Putting in the work upfront saves an unbelievable amount of time, money, and headaches later. A team that walks onto a set with a solid plan can work efficiently, capturing exactly what they need without the drama of costly reshoots or frantic, last-minute changes. It turns a chaotic mess into a smooth, predictable process.
Start With One, and Only One, Goal
Before you even think about a script or a camera, stop and ask the most important question: What is this video supposed to do? So many brands make the mistake of trying to create one video that does everything—explains the product, drives a sale, and builds brand loyalty. That’s a surefire recipe for a muddled message that accomplishes nothing.
Instead, commit to a single, primary objective. This focus is your guiding light; it will dictate the video's tone, pacing, script, and call-to-action.
Want to Explain? If your product is complex or new to the market, your goal is education. The video needs to be incredibly clear, focused on showing how the product works and solves a very specific problem.
Need to Drive Sales? This is all about creating desire. Your video must be persuasive, highlighting the key benefits and showing the product in a way that makes the viewer feel like they need it right now.
Looking to Build Awareness? Here, the goal is to show off your brand's personality. This isn't a hard sell. It's about telling a story that makes your brand memorable and relatable.
Your video's objective is your compass. Every decision you make—from production to the final edit—should point directly back to this core goal. If a shot, a line of dialogue, or a graphic doesn't support it, be ruthless and cut it.
Scripting a Story That Sells
With a clear goal in hand, you can write a script that connects with your ideal customer. A good script isn't just about the words you use; it's about building a narrative that hooks the viewer from the first second and guides them toward taking action. Think of it as a great sales pitch disguised as an engaging story.
Most powerful product video scripts follow a simple, proven structure:
The Hook (First 3-5 seconds): You have to start with a bang. Grab their attention immediately with a relatable problem, a shocking statistic, or a visually stunning shot of your product in action.
The Problem & Solution: Clearly outline the pain point your customer is dealing with. Then, introduce your product as the obvious, simple solution. Focus on the tangible benefits they'll experience, not just a list of technical features.
The Call-to-Action (CTA): You have to tell them what to do next. End with a crystal-clear, direct instruction, whether it's "Shop Now," "Learn More," or "Get Your Free Trial." Don't leave them guessing.
From Script to Shot List: Visualizing the Win
Once your script is locked in, it’s time to translate those words into a visual game plan. This is where a shot list and storyboard are absolute lifesavers. A shot list is basically a detailed checklist of every single camera angle you need to get. A storyboard is a sequence of simple drawings that maps out how those shots will look.
These tools do more than just keep you organized. They ensure your video looks consistent and helps everyone on your team understand the creative vision. Most importantly, they prevent that gut-wrenching moment in the editing room when you realize you missed a critical shot. Your storyboard doesn't need to be a masterpiece from Pixar—simple stick figures and detailed notes work just fine.
And creating a professional-looking setting for these shots doesn't have to be a huge production. Many of the same principles for lighting and setup apply to both photography and videography. For a head start, check out our guide on creating a DIY product photography setup; it's packed with practical tips you can easily adapt for your video shoot. This level of planning ensures every frame looks polished and professional, which speaks volumes about the quality of your product.
Filming Your Product Like a Pro
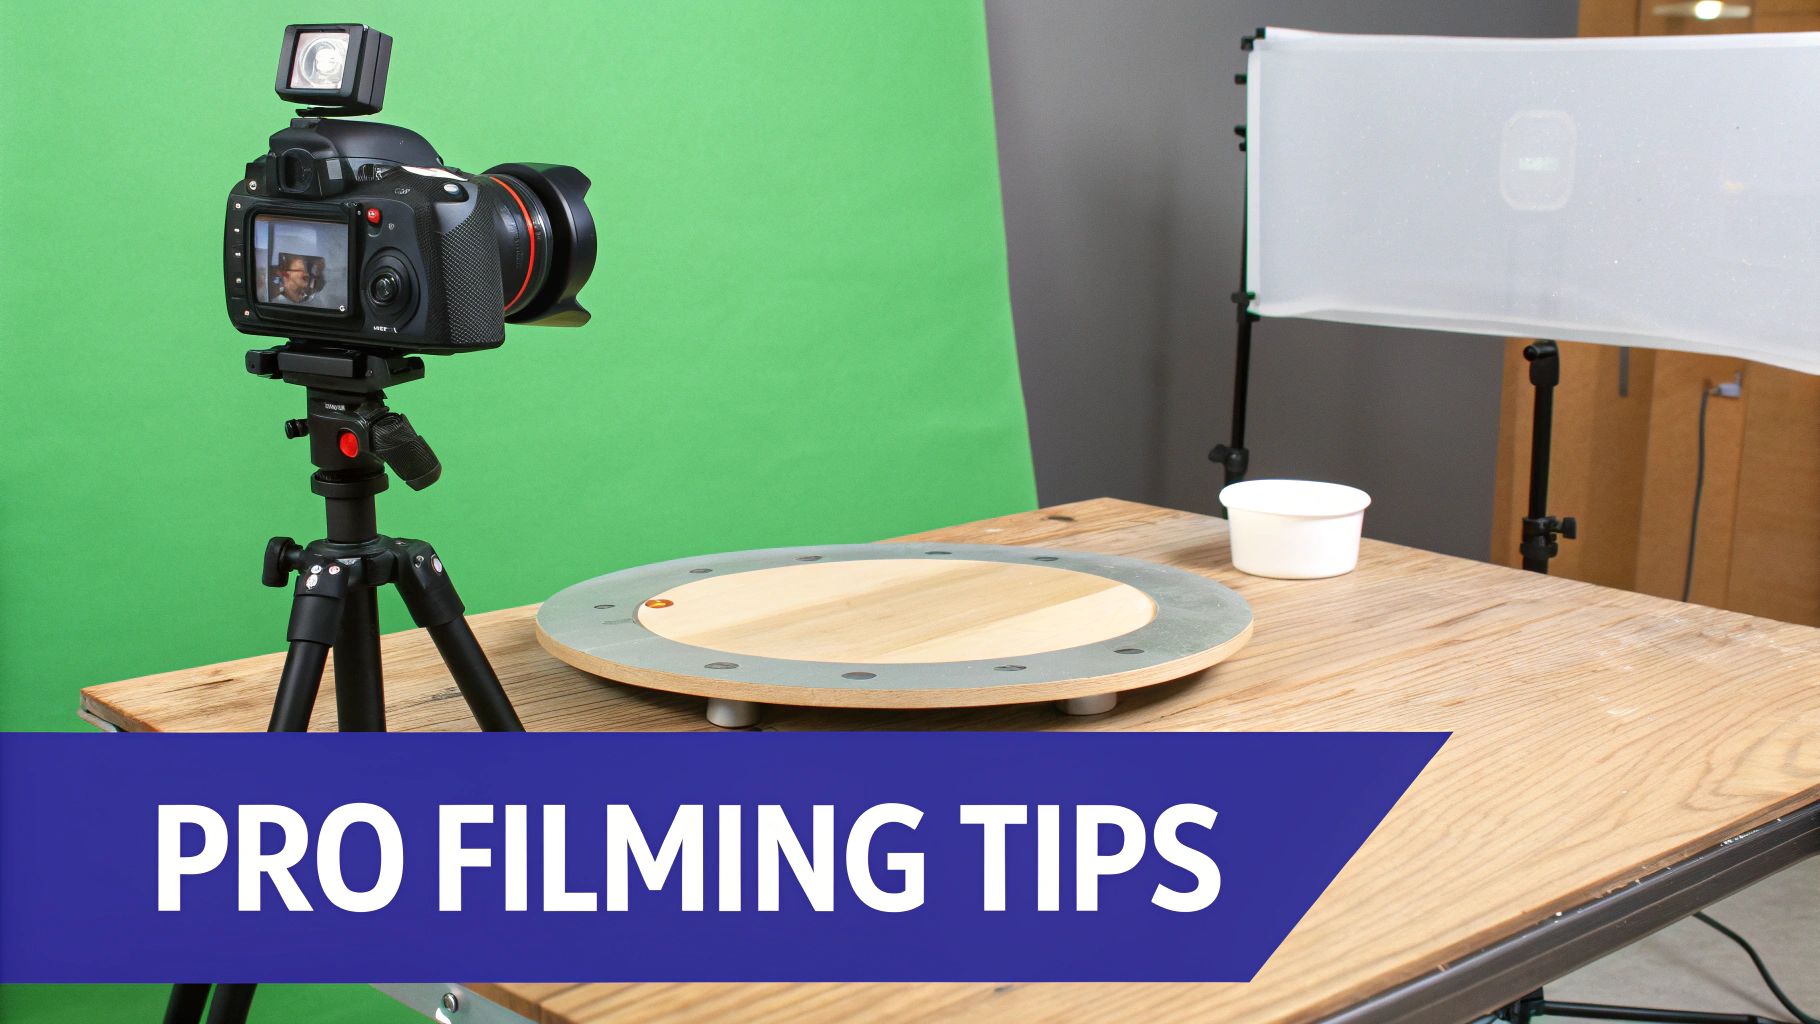
Alright, the planning is done. Now for the fun part: bringing your vision to life. This is where all that pre-production work pays off as you start capturing the raw footage for your video. Don't stress if you're not working with a Hollywood budget. You can get incredible results with a smartphone, a bit of creativity, and a solid grasp of the fundamentals.
Remember, the quality of the footage you shoot now sets the ceiling for your final video's quality. Editing can work miracles, but it can't salvage poorly lit, shaky, or out-of-focus shots. Taking your time here is a huge investment in your video's ultimate success.
Mastering Your Lighting Setup
Lighting does so much more than just make your product visible. It carves out its shape, spotlights key features, and sets a powerful mood. Get it wrong, and even a premium product can look cheap. Get it right, and you can elevate a simple item into something aspirational.
The gold standard for a clean, professional look is the three-point lighting setup. It’s a classic for a reason—it’s a straightforward and incredibly effective way to kill harsh shadows and make your product pop.
Key Light: This is your main light source. Position it to one side of your camera and aim it at your product. It’s the brightest of the three and does most of the heavy lifting.
Fill Light: Placed on the opposite side of the key light, this one is softer and less intense. Its only job is to fill in the shadows created by the key light, revealing detail without overpowering the scene.
Backlight: Sometimes called a rim light, this one goes behind the product. It creates a subtle halo around the edges, separating it from the background and giving it a sense of depth.
No professional lighting kit? No problem. A large window with natural light makes a fantastic key light. For your fill, just grab a white foam board from a craft store to bounce that light back onto the shadowed side of your product.
Choosing Your Camera and Movement
The gear you have is less important than how you use it. Whether you're shooting on a high-end DSLR or the latest iPhone, stability is non-negotiable. Nothing screams "amateur" faster than a shaky, handheld shot. For any static scene, lock your camera down on a tripod to keep your footage crisp and professional.
If you want to dig deeper into the hardware, our guide on choosing the best camera for product photography has a ton of advice that's just as true for video.
Once you’re stable, think about how camera movement can help tell your story.
Static Shots: These are your go-to for clear, focused demonstrations. A locked-down shot keeps all attention on the product, which is perfect for showing off intricate details or walking through a specific feature.
Dynamic Movement: To inject some energy and a more premium feel, subtle motion goes a long way. A slider can create a smooth, cinematic glide across your product, while a gimbal lets you capture fluid, floating shots that follow the action.
The golden rule for camera movement? Always ask yourself: Does this serve the story? Motion should reveal something new or build excitement, not just happen for the sake of it. Purposeful movement always wins.
Deciding Between On-Model and Product-Only Shots
This is one of the biggest creative calls you'll make: do you show your product on its own or with a person? There's no single right answer; the best choice is all about what you're trying to achieve with your video.
On-Model Videos are absolute dynamite for products where context, scale, or fit is a major selling point. Think apparel, accessories, or home fitness gear.
Why it works: Seeing someone use the product helps customers instantly picture it in their own lives. It answers crucial subconscious questions like, "How big is that backpack, really?" or "How does that dress actually move?" This relatability builds a powerful emotional connection.
Best for: Fashion, jewelry, tech gadgets, and lifestyle goods.
Product-Only Videos let you put craftsmanship and detail under a microscope. These are often shot on a clean, neutral background to eliminate all distractions.
Why it works: The product is the undisputed hero of the shot. Viewers can focus entirely on its quality, texture, and unique features. This is the perfect approach for showcasing premium materials or a complex mechanical function.
Best for: Luxury goods, high-end electronics, cosmetics, or anything with intricate details.
Often, the most powerful approach is a mix of both. You can open with stunning product-only shots to establish quality and then transition to on-model footage to show how it fits into the customer’s world. It's truly the best of both worlds.
Using AI to Streamline Your Editing Workflow
You've got the footage in the can—that's a huge win. But the real magic, the part where a collection of clips becomes a story that sells, happens in post-production. This is where you stitch everything together, playing with pace, mood, and impact with every single cut. Editing is what turns raw footage into a powerful asset.
For a long time, this was the biggest bottleneck for marketing teams. It's slow, technically tricky, and usually requires someone who really knows their way around complex software. Thankfully, AI-powered tools are completely changing this dynamic, automating the grunt work and making great video accessible to everyone.
From Raw Footage to Polished Asset
At its core, editing is storytelling. You'll start by dropping your best takes onto a timeline, following the narrative you laid out in your script. Every cut needs a reason to exist—whether it's to reveal something new, build a little tension, or just zero in on a killer product feature.
But it’s about more than just stringing clips together. A great edit involves several layers:
Pacing and Rhythm: How quickly you cut from one shot to the next sets the video's entire energy. Rapid-fire cuts feel exciting and urgent, perfect for a flash sale. Slower, more deliberate transitions give off a more thoughtful, high-end vibe.
Color Grading: This is way more than just a filter. Color sets the mood. Warm, golden tones can feel inviting and approachable. Cool, desaturated blues and grays often signal something sleek, modern, or tech-focused.
Sound Design: Never, ever underestimate audio. The right song, a few subtle sound effects, and a crisp voiceover can be the difference between a video that’s just "good" and one that people can't forget.
This is the Look Atlas interface, where you can generate and manage all of your visual content in one place.
You can see how the platform is built to handle everything from single shots to complete product videos, making it incredibly versatile for any e-commerce brand.
The Rise of AI-Accelerated Workflows
Okay, this is where things get really exciting, especially for busy brands. Instead of sinking hours—or even days—into manual editing tasks, AI tools like Look Atlas can do the heavy lifting for you. This frees up your team to think about the big picture and the creative vision, rather than getting stuck in the weeds of technical work.
Think about a common scenario: you just shot a new jacket and now you're sitting on a mountain of raw footage. You need videos for your product page, Instagram Reels, TikTok, and YouTube Shorts.
The old way meant handing it all off to a video editor who would manually cut each version, reframe it for different aspect ratios, add some motion graphics, and export everything one by one. That's easily a full day's work, if not more.
With an AI-accelerated workflow, that timeline shrinks dramatically. You can upload your footage and let the system automatically generate high-quality motion renders, create perfectly formatted versions for every social platform, and even suggest edits based on what’s proven to work.
How Look Atlas Automates Post-Production
Tools like Look Atlas bake AI right into the content creation process. This isn't just about making things faster; it's about making better, more consistent content, and doing it at scale. The platform can even take a simple product photo and turn it into a dynamic, on-model video without ever needing a physical photoshoot.
Here’s a look at how it automates the workflow:
Instant Motion Renders: The AI can analyze a product and generate realistic motion, showing how a fabric drapes and moves or how a product functions in 3D space. This adds a level of polish that used to require expensive animation software.
Automated Resizing: It can instantly spit out your video in every aspect ratio you need—9:16 for Reels, 1:1 for the 'gram, 16:9 for YouTube. This completely gets rid of the mind-numbing task of re-framing shots for each platform.
Consistent Visuals: The AI keeps your lighting, color, and overall style locked in across every video, which is crucial for building a strong, recognizable brand identity. AI can also be a lifesaver for improving the quality of your existing visuals, which we dive into in our article about using Photoshop's AI to upscale images.
By letting AI handle these post-production chores, you give your team the power to produce a much higher volume of great video content in a fraction of the time. That newfound efficiency means you can test more ideas, jump on trends faster, and ultimately, drive more sales.
Getting Your Video Out There for Maximum Impact
So you’ve created a fantastic product video. That’s a huge win, but it's really only half the battle. A brilliant video that no one ever sees won't move the needle on your sales, which brings us to the final, critical piece of the puzzle: strategic distribution. This is where you get your polished masterpiece in front of the right eyeballs and turn those views into actual customers.
Your distribution plan isn't just a matter of uploading the same video file everywhere. You have to think about the environment of each platform. The way someone scrolls through TikTok is miles away from how they browse your e-commerce store, and your video needs to fit in naturally.
One Size Doesn't Fit All: Tailoring Video for Each Platform
I see this mistake all the time: a brand pushes the same 16:9 horizontal video everywhere. It looks great on their website, but it’s a total disaster on Instagram Reels, with huge black bars and tiny text. Pushing the same file across all channels is a surefire way to kill engagement before your video even gets a chance.
Every platform has its own unwritten rules and user expectations. Adapting your video to these nuances is non-negotiable if you want to see real results.
Instagram Reels & TikTok: These platforms are built for vertical, mobile-first video (9:16 aspect ratio). Your content has to be short, punchy, and grab attention within the first second. I've found that keeping things under 60 seconds is the sweet spot.
YouTube Shorts: Just like Reels and TikTok, Shorts are vertical (9:16) and all about brevity. It’s the perfect format for quick-hit tips, behind-the-scenes content, or bite-sized product demos that leave people wanting more.
E-commerce Product Pages: This is your home turf, where you can afford to go a bit longer. A 16:9 or 1:1 aspect ratio usually works best, embedded right next to your product photos. The goal here is to answer questions and show off the details, so a 30-90 second video feels about right.
Honestly, managing all these different formats can be a huge time-sink. A seamless, automated workflow is a game-changer. AI-driven editing tools can take your main video and instantly spit out perfectly optimized versions for every channel, saving you hours of tedious manual resizing.
This diagram gives you a quick look at how an AI-powered workflow simplifies the whole process, from the final edit to exporting for different platforms.
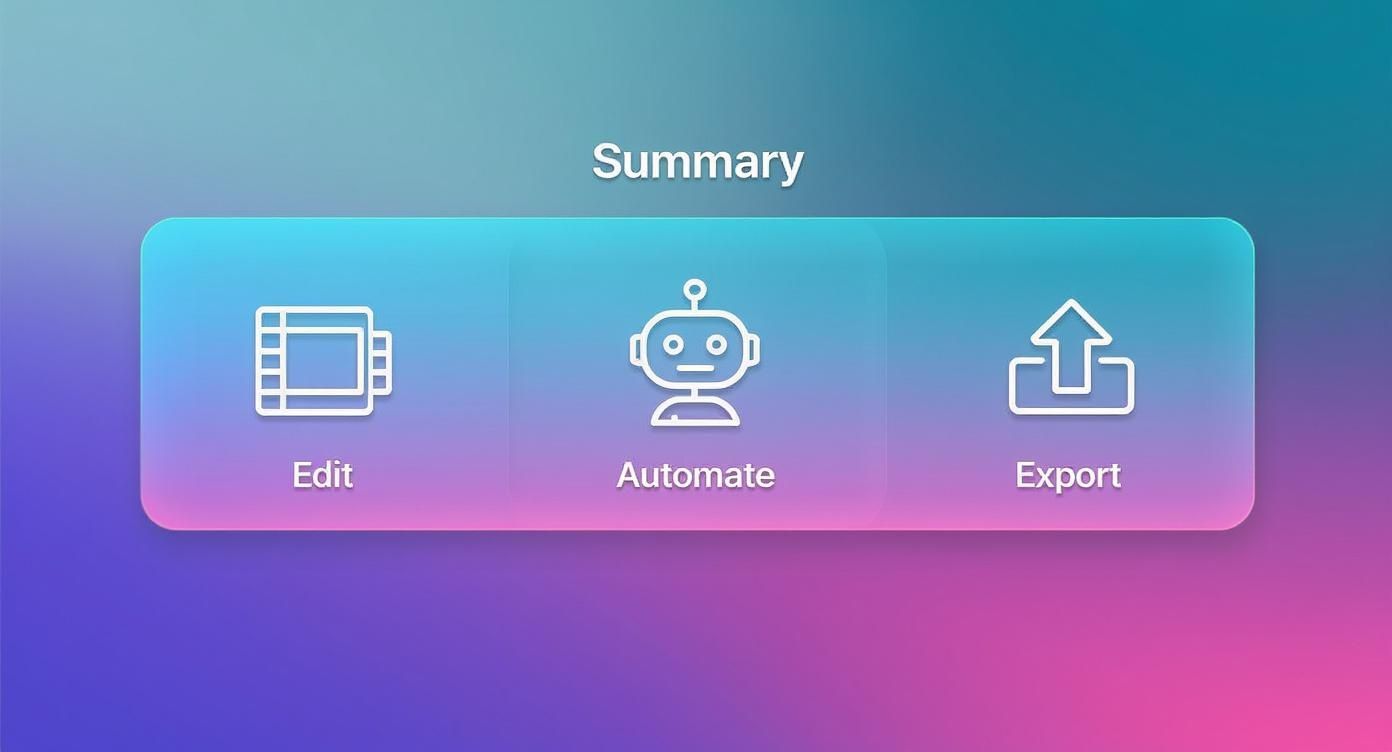
By automating these steps, you can get back to focusing on the creative strategy instead of getting lost in the weeds of technical specs.
To make this easier, here’s a quick-reference guide I use to keep track of the most common formats.
Platform-Specific Video Format Guide
Platform | Recommended Aspect Ratio | Optimal Length | Key Considerations |
|---|---|---|---|
Instagram Reels/TikTok | 9:16 (Vertical) | 15-60 seconds | Sound on is critical; use trending audio; start with a strong hook. |
YouTube (Standard) | 16:9 (Horizontal) | 2-5 minutes | SEO is key; use for in-depth tutorials, reviews, and unboxings. |
YouTube Shorts | 9:16 (Vertical) | < 60 seconds | Fast-paced and engaging; great for discoverability and channel growth. |
Facebook/Instagram Feed | 1:1 (Square) or 4:5 (Vertical) | 1-2 minutes | Most users watch with sound off, so use clear captions. |
E-commerce Product Page | 16:9 or 1:1 | 30-90 seconds | Focus on features and benefits; show the product in use from all angles. |
This table should give you a solid starting point for making sure your video looks its best, no matter where your customers find it.
Optimizing for Search and Discovery
Just like your blog posts and product pages, your videos need to be optimized for search. This is often called video SEO, and it’s how you get your content discovered by people who are actively looking for products like yours on YouTube and Google.
First, nail the keyword-rich title. Think like your customer. Instead of a generic title like "New Jacket Video," try something much more descriptive, like "How to Style Our All-Weather Vegan Leather Jacket."
Next, write a detailed description. Don't be lazy here. Use this space to talk about the product's features and benefits, and work in your target keywords naturally. This text gives search engines the context they need to understand what your video is about.
Finally, design a compelling thumbnail. Your thumbnail is the first impression, and it’s often the single reason someone clicks (or doesn’t). Go for a bright, high-contrast image that clearly shows the product and makes people curious.
Measuring What Actually Matters
To get better, you have to know what's working. Tracking the right metrics will tell you exactly how people are engaging with your videos and, more importantly, if that engagement is leading to sales.
Forget vanity metrics and focus on these key performance indicators (KPIs):
View-Through Rate (VTR): This is the percentage of viewers who watched your entire video. A high VTR is a great sign that your content is compelling and holds people's attention.
Click-Through Rate (CTR): This tells you how many people clicked your call-to-action (like a "Shop Now" button) after watching. It’s the bridge between a view and website traffic.
Conversion Rate: The big one. This tracks how many viewers actually made a purchase after watching. This metric tells you if your video is successfully driving revenue.
The data doesn't lie: video is a powerhouse for conversions. One recent report found that a staggering 87% of viewers said a product video convinced them to buy something. You can dig into more of these trends in the latest video marketing statistics from Wyzowl.
By analyzing these numbers, you’ll quickly learn which video styles and messages resonate with your audience, allowing you to double down on what works and make your next product video even more effective.
Common Questions About Creating Product Videos
Even with the best game plan, you're going to have questions. Everyone does. When you're figuring out how to create product videos that actually sell, a few practical hurdles always seem to pop up.
Let's tackle the most common ones we hear from brands. Think of this as your quick-reference guide to get you unstuck and moving forward with confidence.
How Much Should a Product Video Cost?
This is the classic "it depends" question, but we can definitely put some real numbers on it. A product video can cost you next to nothing or run into the thousands. The final price tag really boils down to a few key decisions.
Shooting it yourself on a smartphone? Your main cost is your time and maybe a few props. Hiring a small freelance crew for a day? You're likely looking at a few hundred to a couple of thousand dollars. If you go all-in with a full-scale production agency, that number can easily jump into the five-figure range.
The biggest cost drivers are almost always:
Talent: Are you hiring professional models or actors?
Location: Do you need to rent a studio or a specific home or outdoor setting?
Crew Size: How many people are on set? A director, a camera operator, a sound tech—it adds up.
Equipment: Are you renting specialized cameras, lenses, lighting, and audio gear?
Here’s a practical way to set a budget: figure out the video's potential return. If a solid video on your main product page could realistically lift sales by 10%, what's that dollar amount worth to you? Let that number be your guide for what you're willing to invest.
Do I Really Need a Professional Camera?
Nope. Absolutely not. Especially when you're just starting out.
The camera in modern smartphones, like the latest iPhone or Google Pixel, is incredibly powerful and more than capable of shooting stunning 4K footage. With good lighting and a steady hand (or better yet, a tripod), you can get clips that look surprisingly professional.
Honestly, the camera itself isn't the most important part. The real difference-makers are the fundamentals:
Lighting: This is non-negotiable. Good lighting will have a bigger impact on your final video than the camera you use.
Audio: Crisp, clear sound is just as crucial. A simple external microphone is a small investment that makes your video feel ten times more professional.
Stability: Shaky footage screams "amateur." A basic tripod is the easiest fix in the world.
Master those three elements with the camera you already own. You can always level up your gear later as your needs and budget grow.
How Long Should My Product Video Be?
The golden rule is simple: as long as it needs to be, and not a single second longer. You're fighting for every moment of attention, so make it count. The right length really depends on where the video will live and what you want it to accomplish.
Short-form video is king for a reason. It's punchy, high-impact, and fits how people consume content today. Generally, anything under 60 seconds is considered short-form, with data pointing to the 31 to 60-second range as a sweet spot for engagement. This trend is a major force, with digital video ad revenue hitting a massive $62.1 billion on the back of a 19.2% growth spurt between 2023 and 2024. If you want to dive deeper, check out these short-form video impact statistics from Passive Secrets.
For a product page on your website, a 30-to-90-second explainer often works perfectly. But on a platform like TikTok or Instagram Reels, you have about three seconds to grab someone. For those, keeping it between 15 and 45 seconds is a much safer bet.
How Can I Measure the ROI of My Videos?
This is where your video efforts go from just "making content" to a real business strategy. You have to know if what you're doing is actually working.
To get a clear picture of your return on investment (ROI), start by tracking a few key metrics:
View-Through Rate (VTR): What percentage of people actually finished your video? A high VTR means your content is engaging and holds attention.
Click-Through Rate (CTR): Of the people who watched, how many clicked your link or call to action? This shows if your video is successfully prompting action.
Conversion Rate: This is the big one. How many viewers went on to make a purchase? Use unique UTM tracking codes or dedicated landing pages to tie sales directly back to specific videos.
Watching these numbers is the only way to prove that the time and money you're putting into video are directly contributing to your bottom line.
Ready to create stunning, on-model product videos without the hassle of traditional photoshoots? Look Atlas uses powerful AI to turn your basic product photos into high-converting videos and images in minutes. Discover how Look Atlas can transform your content workflow and start driving more sales today.